http://downloads.sourceforge.net/gimp-w ... se_mirror=
They use binaries to make the source code available ti the public and it becomes confusing knowing what to download. Heres the simpler windows installer available from their site, it just took a little navigating to find it....looks like the file is around 17.4 megs....Good luck with it!
Using GIMP to change your trucks color
Moderator: FORDification
-
DirtyJim

- New Member

- Posts: 126
- Joined: Tue Jan 04, 2005 3:09 am
- Location: Williamsburg, Virginia
-
NinJaaaaaaaaaah

- New Member
- Posts: 72
- Joined: Fri Apr 16, 2010 5:25 pm
- Location: San Angelo
Re: Using GIMP to change your trucks color
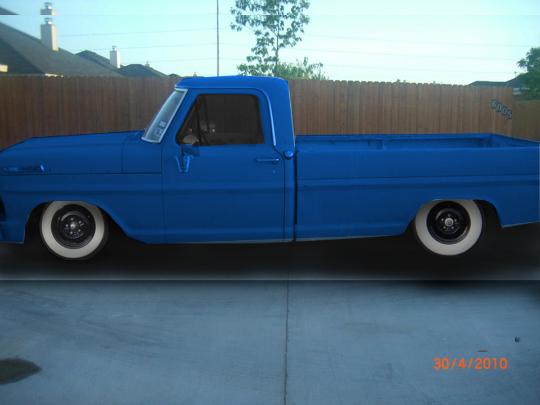
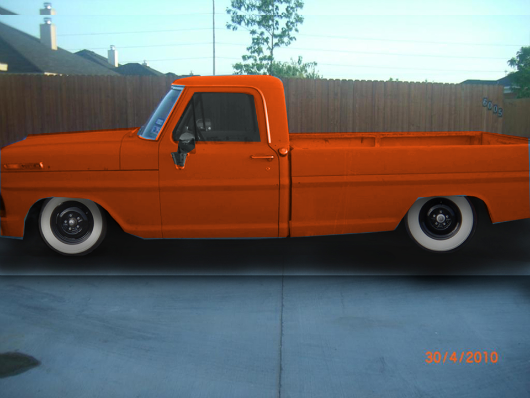
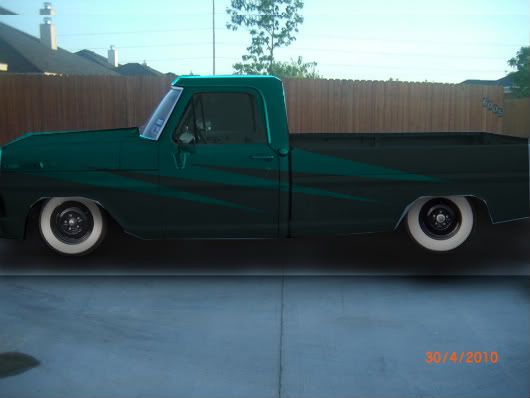
Finally got it figured out, here's a few that i did.I missed some spots though. 
-
DirtyJim
- New Member
- Posts: 126
- Joined: Tue Jan 04, 2005 3:09 am
- Location: Williamsburg, Virginia
Re: Using GIMP to change your trucks color
Hah! That green one is cool!
-
bb429power
- Blue Oval Fan

- Posts: 585
- Joined: Sun Dec 13, 2009 5:44 pm
- Location: Plymouth Michigan
- Contact:
Re: Using GIMP to change your trucks color
Got a couple of questions. Its sweet. But how do you:
A. Resize part of an image that you copied and are pasting on a new image? I need to change the size to make it match with the new image.
B. Upload it to photobucket. I can't even set it as a wallpaper and it opens up Gimp when you try to open up the picture.
A. Resize part of an image that you copied and are pasting on a new image? I need to change the size to make it match with the new image.
B. Upload it to photobucket. I can't even set it as a wallpaper and it opens up Gimp when you try to open up the picture.
Justin
http://www.fordification.com/forum/view ... 22&t=47482
http://s976.photobucket.com/home/bb429power/allalbums go to both of the albums.
1967 Ford F100 longbed with a 466 500+hp/600+ft-lbs (mine)
1969 Mercury Cougar xr7 with a 351w (dads, I helped alot)
1970 Ford Maverick with a 302 (became our drag car)
1986 f150 5.0 (my DD)
"Many can argue, but it takes a real man to apologize."-Me
-
DirtyJim
- New Member
- Posts: 126
- Joined: Tue Jan 04, 2005 3:09 am
- Location: Williamsburg, Virginia
Re: Using GIMP to change your trucks color
I havent tried GIMP yet..I use photoshop pro, but I would imagine there are some similarities. When you save an edited photo in photoshop, it saves the file as a .psd file, which is proprietary for photoshop. You have to use the "save as" feature and choose .jpg, or whatever other file type you want. Gimp may be similar, so browse around the save menu. I would imagine that Gimp has its own proprietary file type that it saves files as by default and that is probably why you cant upload it or do anything else with it....you can usually only open files like that within the application that makes them(Gimp).
I'll have to open up Gimp and play with it a little before I can answer the first question, how to resize an image that you want to paste onto another image. I know how to do it photoshop, but give me a few minutes to go over Gimp.
I'll have to open up Gimp and play with it a little before I can answer the first question, how to resize an image that you want to paste onto another image. I know how to do it photoshop, but give me a few minutes to go over Gimp.
-
DirtyJim
- New Member
- Posts: 126
- Joined: Tue Jan 04, 2005 3:09 am
- Location: Williamsburg, Virginia
Re: Using GIMP to change your trucks color
Alrright, here ya go. Ive had a few minutes to install and briefly use Gimp. There are some similarities with Photoshop, but it lacks detail. For free, you cant beat it.
With Gimp open, assuming youve already opened a photo you want to edit, lets say its a truck. You have your nice truck on the screen. Now, simply open another photo, like a wheel you want to put on the truck. Now, you should have another window that opens for the wheel. It might be way too big to put on the truck like it is, so you need to scale it with the "scale" feature. With the wheel window active(open), click on the Image tab, then click on Scale Image. A new window will pop up with image size attributes listed. Youll see the width and height of the current image in pixels per inch. To make things a little easier to understand, lets say we need the wheel to be about 50 percent smaller than it currently is. It might be easier for you to click on one of the drop down boxes and change pixels per inch to percent. By default, the program will maintain the correct aspect ratio, so we can simply click on the drop down box next to width, select "percent", then click on the box next to "width" and achange it to "50". Click on the Scale Image button and your wheel will be half its original size.
Now, you may have to actually cut the wheel out of an existing image to get it to merge well with your current truck picture, but lets say you've already done that and your ready to paste the wheel onto your truck. Assuming you still have two open windows now, one your truck and the other your smaller wheel, things are easier if you can see both at the same time. The image of the wheel should be a small window, so when I click on it, I should still be able to see the image of my truck. On the right side of the Gimp screen youll see your "layers, channels and paths" window. I dont want to get into explaining layers just yet, but lets open our wheel image and look at the layers window to the right. From the "layers" tab in that window, you should see a small image of our wheel, provided that is the currently selected image. We should also be able to see our truck in the background. From the Layers window to the right, click on the small image of our wheel and drag it onto the image of our truck. Once you do that, your truck image will be open and you will see two layers now...a small image of our truck and one of our wheel, together. Now you can manipulate things however you want....if you want to move the wheel to the right spot on the truck you have to make sure that the wheel layer is highlighted in our Layers window to the right. This assures that when we use the "move tool"(from the tool bar on the left) that we will only move the image of the wheel, not the image of the truck. In addition, you can use coloring and other tools on any layer without affecting the others.
Highlight your truck layer and use your favorite selection tool to draw a selection around part of your truck you want to modify, like the window. Once your selection is made, click on colors and brightness/contrast and make changes to darken or lighten your selection. You should only see the window darken or lighten if you do it right.
When your done working on the image, save it as a new image. It might be a good idea to click on the Image tab at the top of the screen and select "Flatten Image". If you dont do it now, the program will force you to do it before you can save the image as a jpg. Flattening the image combines all the individual layers into one image. Keep in mind that you will no longer be able to select individual layers to work on once you do this. Once thats done, click on the File tab, select Save As. The Save As dialog window opens...simply select the location you want to save the new picture to, click on the + sign next to Select File Type(by extension) and scroll through the list to select JPEG Image. This will open the compression dialog box. Here, you need to adjust the compression slider according to your liking. Ignoring the advanced options for now, adjusting the slider all the way to the right will save the image at the highest visual quality, but the file size will be large. Moving the slider to the left decreases the size of the file, but also the quality of the image. I always save in the highest quality until I am ready to upload to the internet. If you need to make the file size smaller for emailing or uploading to the web, simply save the file as a jpeg and adjust the compression....the estimated file size is shown below the slider.
-
DirtyJim
- New Member
- Posts: 126
- Joined: Tue Jan 04, 2005 3:09 am
- Location: Williamsburg, Virginia
Re: Using GIMP to change your trucks color
There are many many things that can be done with the program, and a lot of those things have many different ways to accomplish the same task. Dont be afraid to ask questions, but keep in mind that it can get quite involved.
Fordification likes files to be 800x600 resolution. If your edited image is larger than that you will have to resize it. Resize your images Before you save them and adjust compression....you want your image to be the best quality for the file size you need.
When saving your images, don't forget to RENAME them when you save! This will prevent you from overwriting the original image and losing it.
You can spend a lot of time editing images....when you start work on an image, it helps to duplicate that layer and work from the copy. If anything bad happens, your original image is still intact.
If you plan on working on the image later and have several layers open, just use the "Save" option. This will save your image, as is, with all of the current layers still open. The file type created can only be opened within Gimp, but you will be able to resume working where you left off later. Use "Save As" when you need your image to be converted to a different file type. You will have to flatten your image, or merge all the visible layers to do this.
-
DirtyJim
- New Member
- Posts: 126
- Joined: Tue Jan 04, 2005 3:09 am
- Location: Williamsburg, Virginia
Re: Using GIMP to change your trucks color
Assuming your familiar with the layout of the program:
When doing color changing, there can be a lot of ways to achieve different results. Try to select only the area you want to change, by using the selection tools. Try using the "Free Select" tool and zoom way in on the area you want to edit. using the select tool and carefully outline the area by clicking from point to point...keep the distance short between the points and you can make fine selections around curves. move all the way around the area back to the where you started and your selection should "complete" Now you can use the "Color" tab and any changes you make will only affect the selected area. You can cick on the Select tab and choose None to deselect the area when your done. Zoom back out to normal view and it should look real nice!
When changing colors, sometimes it helps to "desaturate" the image first. This will make the image black and white and can make color changes look more natural.
Play with effects like Hue and Saturation, adjust curves, play with brightness or contrast. All of these can be combined to achieve some very realistic effects.
It takes a lot of practice.
The Layers/Channels/Paths window to the right contains a lot of valuable information. You can work on different blending options within individual layers, delete or duplicate layers and if you click on the "Open Undo History dialog" tab you can step backwards in time and undo any individual changes you have made.
-
bb429power
- Blue Oval Fan
- Posts: 585
- Joined: Sun Dec 13, 2009 5:44 pm
- Location: Plymouth Michigan
- Contact:
Re: Using GIMP to change your trucks color
Thanks a million. I don't know what I would have done if I didn't get your help.
Justin
http://www.fordification.com/forum/view ... 22&t=47482
http://s976.photobucket.com/home/bb429power/allalbums go to both of the albums.
1967 Ford F100 longbed with a 466 500+hp/600+ft-lbs (mine)
1969 Mercury Cougar xr7 with a 351w (dads, I helped alot)
1970 Ford Maverick with a 302 (became our drag car)
1986 f150 5.0 (my DD)
"Many can argue, but it takes a real man to apologize."-Me
http://www.fordification.com/forum/view ... 22&t=47482
http://s976.photobucket.com/home/bb429power/allalbums go to both of the albums.
1967 Ford F100 longbed with a 466 500+hp/600+ft-lbs (mine)
1969 Mercury Cougar xr7 with a 351w (dads, I helped alot)
1970 Ford Maverick with a 302 (became our drag car)
1986 f150 5.0 (my DD)
"Many can argue, but it takes a real man to apologize."-Me