FORDification.com
   (powered by Google)


  HOME

  Technical Articles

  Factory Literature

  Discussion Forums

  Photo Galleries


  Service Bulletins (TSBs)

  Decoding Your VIN

  Diagrams & Schematics

  Links & Resources

  In the Movies

  Downloads
  Member Meet & Greets

  In the Media

  Site Index

 MISC / PERSONAL

  My Truck Projects

  My Heinz 57 '67

  I've Been Censored!

  Contact


You are here: Home My Truck Projects The '67 Page 40
Back to My '67 Project Index
Taking Pics and Taking Inventory - Part 2

On the previous page I posted many pictures of the loose parts that were in the bed of the '67 F250 Camper Special when I got it. The pictures on this page document other views of the truck that I wanted archived before I began a teardown. It's always the small details that tends to be overlooked, and photo documentation like this is a great way of refreshing your memory when it comes time to begin reassembly.

1967 F250 Camper Special
Exterior/Undercarriage Documentation

Fig. 1 - There are four small dents in the roof on the driver's side. These should be fairly easy to pop back out.

Fig. 2 - The driver's-side door has been sideswiped and will need to be replaced. (I already have another good '67 door.) The damage here just barely extends into the cab's door pillar...another easy fix.

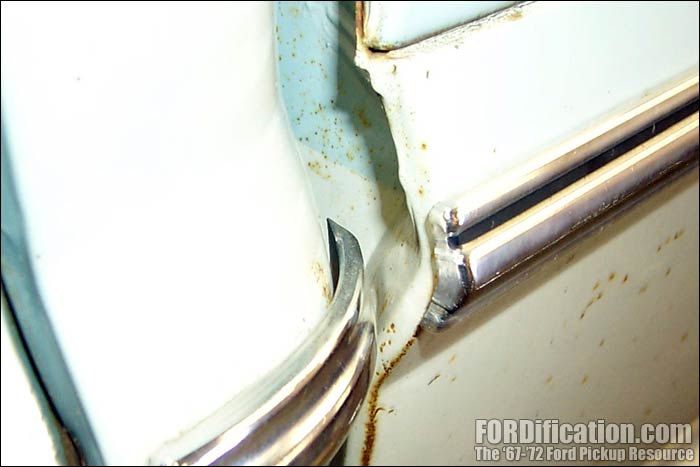
Fig. 3 - Another reason for replacing the L/S door is this dent. What's strange is that the paint isn't scratched or disturbed in any way, almost leading me to believe it came from the factory like this, before being painted on the assembly line. The weather-stripping which contacts this area was formed to this dent also.

Fig. 4 - I just thought it was worth documenting that on tu-tone paint, the second color extends about 2"-3" around the corner of the bed. This shot was taken on the left side between the cab and bed.

Fig. 5 - These two holes were drilled in the cab for an aftermarket A/C setup. These will have to be welded up.

Fig. 6 - This "166" was scrawled with a grease pen by the factory, and is located on the left-side outer firewall.

Fig. 7 thru 10 are simply documenting the routing of the emergency brake cable. Trucks equipped with a factory in-frame auxiliary fuel tank had a different (longer) e-brake cable that was also routed differently. When it exits the left-front cab corner, it proceeds directly to the top front corner of the tank and is attached there before continuing back.


Fig. 7

Fig. 8

Fig. 9

Fig. 10

Fig. 11 - In this shot you can see another view of the L/S exhaust running outside the frame. Check out that clean bed bottom!

Fig. 12 - A view of the transmission tunnel area from the driver's side.

Fig. 13 - A view of the driver's-side floorpan looking back towards the cab support. Nothin' but light surface rust!

Fig. 14 - This is a view of the backside of the L/S cab corner. A tiny bit of rust did start here, but the previous owner cleaned and sealed the inside, then filled the pits on the outside with body filler.

Fig. 15 - Here's a shot of the front of the L/S cab corner. You can see the auxiliary tank selector valve and the fuel line coming from the in-cab tank.

Fig. 16 - Looking forward. Ain't that a pretty cab bottom? This is going to require nothing but a slight sanding before paint.

Fig. 17 - Ever wonder how those rear e-brake cables are supposed to be supported? Now you know.

Fig. 18 - Another shot of the clean bottom of the bed. I was unable to find any cancer anywhere on this bed.

Fig. 19 - There are two of these hanging down at the back of the bed, right by the missing rear bumper. Are these for license plate lights or trailer wiring?

Fig. 20 - My '67 F100 had a small rod sticking out of this hole for a steering bump stop. This F250 has an adjustable bump stop.

Fig. 21 - The previous owner had installed new kingpins and bushings, new front springs and polyurethane radius arm bushings.
 

1967 F250 Camper Special
Interior Documentation

Fig. 22 - The glovebox liner is actually in pretty good shape. It's a little distorted along the bottom after somebody removed it to remove the aftermarket A/C setup. It was then just slid in without being screwed down. I believe it'll flatten itself down when properly attached.

Fig. 23 - This is the first R/S vent I've ever seen that wasn't marked with "VENT", "ON" and "OFF".

Fig. 24 - The aftermarket A/C setup that was removed also left these two holes in the R/S floorboard that will need to be filled, but should be an easy fix.

Fig. 25 - It appears that the "color-keyed" floor mats offered by Ford were originally black, with colored heel pads glued on, depending on the interior color.

Fig. 26 - The passenger-side windshield gasket actually had a 1/2" gap where you could see daylight through.

Fig. 27 - The radio hole was butchered by a previous owner. This really won't be a problem, since I plan on installing an in-dash CD player anyway, and will probably have to widen the hole a little bit more.

Fig. 28 - Check out the front seat. Other than a couple small rips along each side panel, it's in great shape. There is no wear in the seat area from what I could see.

Fig. 29 - Here's a view of the front seat you probably don't see too often...unless you're working under the dash.

Fig. 30 - I've never see this on a solid transmission hump either. This is definitely factory, though the hole this covers is cut a little rough. (see Fig. 12 above)

Fig. 31 - Ever wonder what it looks like down inside the door pillar, down into the rear cab corner? I aimed my camera down into the passenger-side cab corner area and snapped this shot.

Fig. 32 - Here's a comparison shot I've been meaning to take for a long time but never did. This shows the difference between the '67 vs. the '68-'72 glovebox door buttons.

Fig. 33 - Here's the neutral safety switch.

Well folks, that's it for now....as if FIFTY-NINE new pictures on two new pages wasn't enough! Hopefully the pics posted here will help you out on your truck or give you some ideas for modifications.

I'm going to be doing some thinking over the next week or so and then making a decision what to do with my project. As things tentatively sit right now, this F250 is going to be donating a lot of it's parts for my F100, including the cab, right-side door, fenders, e-brake cable and hardware, one of the inner fenderwells, and possibly the grille and hood. The rest of the pieces could likely be sold to help finance this project, although I HAVE been considering possibly stockpiling all the extras for a later F250 build-up. I'll just have to wait and see how things go.

Anyway, I think next on the list is to go ahead and strip the cab and roll it onto it's back so I can coat the bottom, and then get it lifted onto my F100 chassis. This could conceivably take place within the next month, depending on my schedule and finances.

Stay tuned!


first  previous

next   last


Home  |  Back to My '67 Project Index  |

You are here: Home My Truck Projects The '67 Page 40


Want to link to this site? Please save this banner to your hard drive to place on your webpage.
The correct link to use is http://www.fordification.com


Copyright library© 1999-2019 FORDification.com unless otherwise noted. All rights reserved.
All brand names and product names used on this website are trade names, service marks or registered trademarks of their respective holders.  
No portion or content of this site may be reproduced or otherwise used without explicit permission.
To report problems or provide comments or suggestions, please click here.