Does anybody have a pic. of a bed side with the upper panel removed. I wa just wondering what it would look like. My is rusted like alot of yours are and I was thinking of tearing it down to fix it but did not know what I am up aganist. I know this has been talked about but I could not find any pics. Thanks.
P.S. Its a wide bed.
BED SIDE PICS
Moderator: FORDification
-
DIXONBOY
- New Member

- Posts: 100
- Joined: Sat Nov 28, 2009 3:20 pm
- Location: Greenville Texas
-
fordman
- 100% FORDified!

- Posts: 22330
- Joined: Sun Aug 28, 2005 8:17 pm
- Location: Kansas, Ottawa
- Contact:
Re: BED SIDE PICS
the top part of the bed? the top part of the bed extends down to the floor onn both the styleside and flareside beds on the inside.
-
DIXONBOY
- New Member
- Posts: 100
- Joined: Sat Nov 28, 2009 3:20 pm
- Location: Greenville Texas
Re: BED SIDE PICS
I thought the bed was two pieces. My rust is on the outside in the seam. I have seen a thread were they talked about it. I thought the seam was were the two parts split?
-
FORDification

- Site & Forum Admin

- Posts: 8050
- Joined: Sun Jul 11, 2004 12:52 am
- Location: Kansas, Wellsville
- Contact:
Re: BED SIDE PICS
Yes, the bed sides are in two pieces. Here's a shot I took from the rear of a bed after removing the end cap.
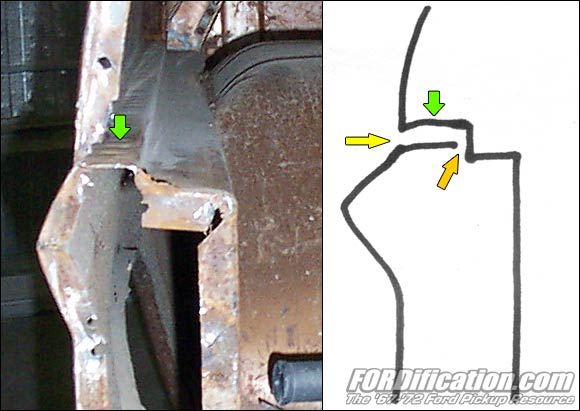
The green arrow points to where the two panels are spot-welded together. The orange arrow points to the backside of the seam, where road debris, salt, dirt, etc. enter between the spot welds and rust this seam out. By the time it gets to the outside where you can see it (yellow arrow), it's usually pretty bad. Just filling the seam on the outside really doesn't do anything except hide the problem for a while...you totally seal it up you also need to seal the backside.
The green arrow points to where the two panels are spot-welded together. The orange arrow points to the backside of the seam, where road debris, salt, dirt, etc. enter between the spot welds and rust this seam out. By the time it gets to the outside where you can see it (yellow arrow), it's usually pretty bad. Just filling the seam on the outside really doesn't do anything except hide the problem for a while...you totally seal it up you also need to seal the backside.
____| \__
-O-----O- Keith
'67 F-100 2WD SWB ~ '69 F-100 4WD SWB w/7" chop ~ 1975 F-250 Ranger XLT Supercab Camper Special

My '67 restoration video
-> Posting and you! <-a MUST watch for all!!
-O-----O- Keith
'67 F-100 2WD SWB ~ '69 F-100 4WD SWB w/7" chop ~ 1975 F-250 Ranger XLT Supercab Camper Special
My '67 restoration video
-> Posting and you! <-a MUST watch for all!!
-
DIXONBOY
- New Member
- Posts: 100
- Joined: Sat Nov 28, 2009 3:20 pm
- Location: Greenville Texas
Re: BED SIDE PICS
Thank you. Thats just what i was looking for!!
-
DIXONBOY
- New Member
- Posts: 100
- Joined: Sat Nov 28, 2009 3:20 pm
- Location: Greenville Texas
Re: BED SIDE PICS
Thanks for going through the trouble of getting that pic. Sorry about that. I just ran across the other thread you posted it in. I noticed there are alot of repeat questions on here.
-
red403
- New Member
- Posts: 222
- Joined: Mon Oct 05, 2009 1:51 am
Re: BED SIDE PICS
What is the best way to remove the end cap on the box. I want the 67 caps but the box I am likely going to use is a 70 box. I don't want the light at the back. Just looking for the best way.
-
FORDification
- Site & Forum Admin
- Posts: 8050
- Joined: Sun Jul 11, 2004 12:52 am
- Location: Kansas, Wellsville
- Contact:
Re: BED SIDE PICS
You can't remove one intact. It's spotwelded in about a hundred places which are impossible to get to to drill out...or weld back in, for that matter. It would be easier by far to just cover the hole for the marker light with a patch panel.
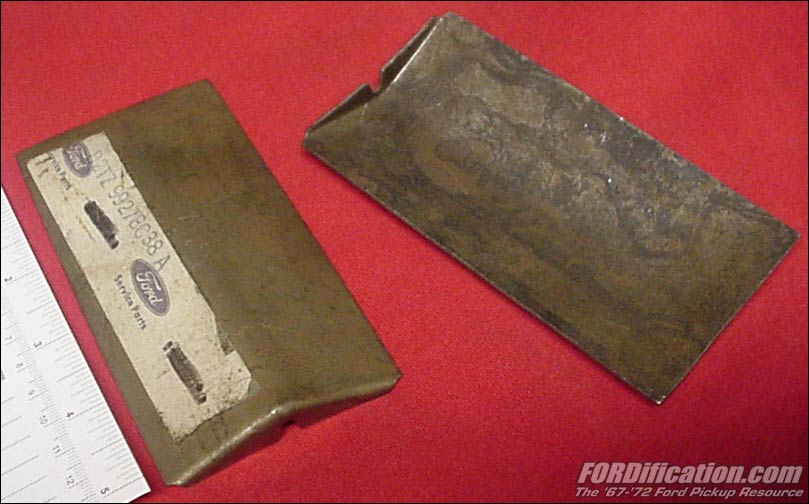
When the '70 model trucks came along with the rear-mounted bed lights, Ford ceased maintaining an inventory of the quarterpanel extensions for the '67-'69 trucks. Instead, they simply kept the '70-'72 extension in stock, as well as this patch, which would've been used to cover the marker light hole and convert the '70-'72 quarterpanel extension to the '67-'69 style. You could whip something up like this from a junkyard truck.
When the '70 model trucks came along with the rear-mounted bed lights, Ford ceased maintaining an inventory of the quarterpanel extensions for the '67-'69 trucks. Instead, they simply kept the '70-'72 extension in stock, as well as this patch, which would've been used to cover the marker light hole and convert the '70-'72 quarterpanel extension to the '67-'69 style. You could whip something up like this from a junkyard truck.
____| \__
-O-----O- Keith
'67 F-100 2WD SWB ~ '69 F-100 4WD SWB w/7" chop ~ 1975 F-250 Ranger XLT Supercab Camper Special
My '67 restoration video
-> Posting and you! <-a MUST watch for all!!
-O-----O- Keith
'67 F-100 2WD SWB ~ '69 F-100 4WD SWB w/7" chop ~ 1975 F-250 Ranger XLT Supercab Camper Special
My '67 restoration video
-> Posting and you! <-a MUST watch for all!!
-
red403
- New Member
- Posts: 222
- Joined: Mon Oct 05, 2009 1:51 am
Re: BED SIDE PICS
Thanks, I was thinking that cutting the panel out of the cap in my 67 would be the best way to go, then weld it into the newer box.
-
fordman
- 100% FORDified!
- Posts: 22330
- Joined: Sun Aug 28, 2005 8:17 pm
- Location: Kansas, Ottawa
- Contact:
Re: BED SIDE PICS
i ddi this once. i used a sawzall to cut the end cap off of a bed. i was going to scrap. i just followed down the bed seam line. it was kind of tough to keep a straight line. i did end up cutting into the be side itself before i got down to the bottom. i wish now that i wouldnt have done that to that bed. but its too late.