|


|

Page 10
The Week of Bodywork |
|
 |
|
Monday, May 07, 2007 - If you remember from my last
update, I mentioned I was taking the entire week off to get some
bodywork done. Well, Day 1 of the Week of Bodywork is
over....and man, was it LONG! I literally spent the entire day
doing nothing but sanding. My right arm feels like it's about
ready to fall off....and I'm hoping my fingerprints will grow
back eventually! I'm about 1/3 done with the outside. The front
fenders are ready to paint, as is the rear of the cab and the
cowl. The roof and doors still need a little work, so that's
what I'll be doing tomorrow.
errr....well, not tomorrow, I guess. I decided that I'd really
like to get the seats I'm going to use before painting the cab
floor, so I'll have an idea of what kind of drilling I'll need
to do first. So I'm going to spend the day junkyarding tomorrow,
and see what kind of cool bucket seats I can pick up. Then it's
back to work on Wednesday.
Tentatively speaking, I should be able to finish the bodywork on
Thursday and get the truck painted on Friday. |

Fig. 01 - Here's a shot of the cowl area at the end of the
day, sanded and ready to paint...
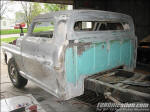
Fig. 02 - ...and a rear view of the cab, ready to paint. |
 |
|
Fig. 03 - Here's the '94 Ford Probe which donated it's
bucket seats.

Fig. 04

Fig. 05 - Here's a view after removing them.

Fig. 06 - The Bronco center console |
Tuesday, May 08, 2007 - Well, I just got back
into town from spending the day at the U-Pull-It. The goal
for the day was to find a good pair of bucket seats to use.
And I think I done good.
The yard I was at (one of two in Omaha) had roughly 400-500
cars, so I spent several hours just roaming the yard looking
at everything. If I'd have wanted seats in maroon, tan or
blue, I'd have had lots to choose from. However, I really
wanted black, though I decided I'd also settle for grey. I
could only find a few pairs that were black, and while they
looked great, they'd still have needed reupholstered. I
finally narrowed it down to three cars, each with grey
buckets: a Plymouth Lazer, a Toyota Celica and a Ford Probe.
After going back and comparing the three, I finally decided
on the Probe seats. Of course, the fact that they're Ford
parts probably had a tiny bit to help with the
decision.
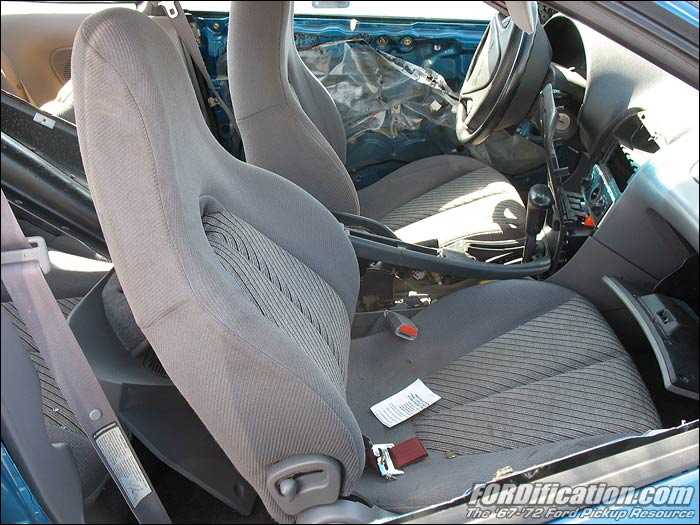
Figs. 03 and 04 are shots of the donor car and still-mounted
seats, and Fig. 05 shows them after getting them removed.
They'll need a slight shampooing, but otherwise they're in
fantastic shape. They're covered with tweed, so the
upholstery is sturdy, they're firm, they sit only a few
inches off the floorpan (which was mandatory) and the
driver's seat even has electric lumbar and bolster supports.
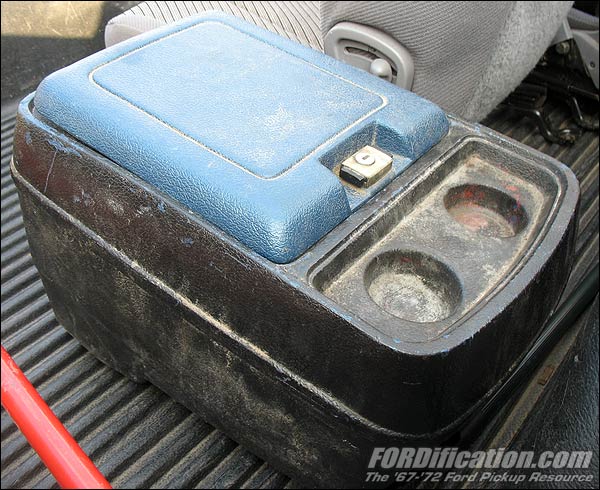
I then decided I needed a center console to go with the
buckets, but everything in the yard which had a console was
set up for a floor-shift automatic, and I'm going with a
column-shift tilt column. Plus all those consoles were
broken to hell anyway. The only two exceptions I could find
of a free-standing console was on an Isuzu Trooper (though
it was kinda small) and what I ended up getting: the console
from a full-size Ford Bronco...which was another plus in
keeping it all-Ford! (Fig. 06) This console was actually put
together from three different trucks...I got the main
console body from one truck, the lid from another and the
lid latch from a third. It'll clean up nicely, I think, and
will give me plenty of storage plus should be about the
right height to also use as an armrest. |
|
|
|
Wednesday, May 09, 2007 - Well, today was
just about a wasted day, as far as bodywork goes anyway.
I was kinda anxious to get the buckets set into the
truck just to get an idea of what kind of work would be
needed to get them mounted, and how low I could get them
to set. I pretty much figured on completely removing the
tracks, and just bolting the seat frame itself directly
to the floor. It turns out that the inside mount on each
side will be easy...no mount fabrication necessary, just
bolt it directly to the floor. However, the outside
mounting point on each side will require a full custom
mount.
I hit the shop a little before 9AM...and spent the
ENTIRE day getting the driver's-side mount fabricated.
It definitely took a lot longer than I thought, due to a
number of factors. I tried several different things
before deciding on a course of action. Once I made the
decision constructing the mount, I had to redo my own
work twice, due to some warping during the welding
process. Mad Oh well...the other side should go a lot
faster, now that I know what I'm doing (more or less).
Wink
Anyway...Fig. 07 shows the factory mounting on the Probe
seats. (Incidentally, what I thought was electric lumbar
support adjustment is actually vacuum...the small
canister up under the seat is the vacuum pump.)
A while
back I bought a pair of seat brackets that was
advertised as for mounting a bench seat. I decided to
try using these first...and if the floorpan was
completely flat, these would've worked great. Fig. 08
shows one bolted up to the seat frame, after removing
the plastic cover and grinding out the factory rivets
and spotwelds holding the tracks to the frame. However,
because the outer edge of each seat sticks out past the
flat section of the floorpan, these wouldn't work. I
toyed around with several ideas to modify them to make
them work, but in the end I decided it would be too much
work and would look crappy, so I just decided to build
something from scratch.
Since I just cleaned out my shop a few weeks ago of most
of my scrap iron, I didn't have a lot to choose from for
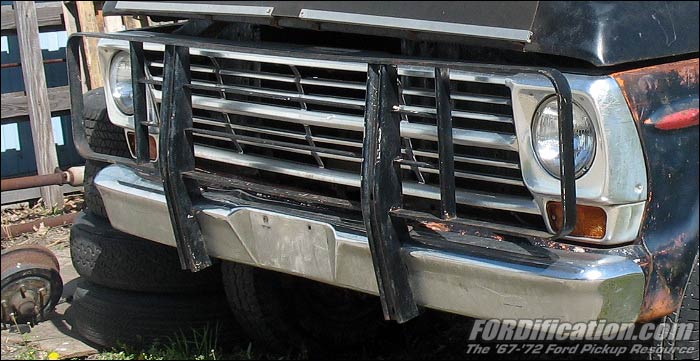
steel stock. I was walking around the 4x4 outside trying
to get some ideas, when I suddenly noticed that the
grille guard on the front of the truck had exactly what
I needed. Since I wasn't really attached to it anyway,
it donated the 1/4" steel to make these brackets. Very
Happy (Yeah, I know...overkill, right? But at least I'll
never have to worry about them bending or breaking!)
The outside headlight loop on each side of the grille
guard will be the main section for the seat mounts, so I
got started cutting those off (Fig. 10).
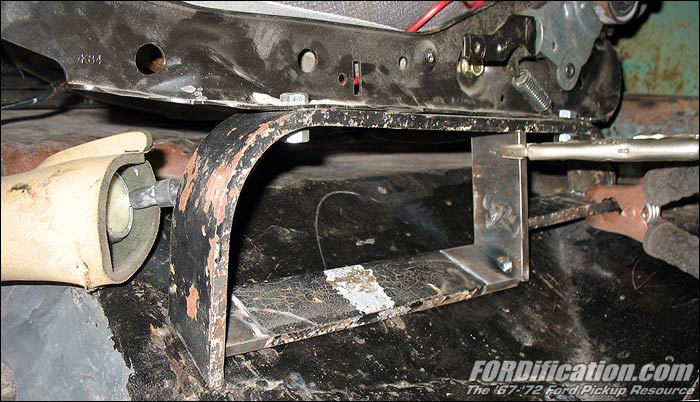
Fig. 11
was taken about halfway through the fabrication of the
driver's-side mount. I'm getting things just tack-welded
into place until I'm sure it's all gonna fit and work
right. I made the mistake of thinking that the tack
welds would hold things in place when the mount was
removed so it could be fully welded up. I ended up with
some warpage between several of the pieces while doing
the final welding, and while they'd have still worked, I
just wasn't happy with the results, so I ended up
cutting several welds and redoing them...only to have
the same thing happen again! I again removed the
welds, but this time I built a clamping device to hold
everything in place and keep it square, and the third
time it worked great. Fig. 12 shows the semi-finished
mount in place. All that's left to do is actually drill
the mounting holes and bolt it into place, and to drill
one more hole for another bolt from the seat frame to
the bracket, so there will be three bolts there, and
then drill three more to bolt the bracket to the cab
floor. I figure maybe an hour's worth of work to finish
up this side, then I simply have to re-create this for
the passenger side. Fig. 13 shows a shot of the bracket
with the plastic side cover reinstalled.
Anyway,
since I wasted a whole day working on this, I'm a little
behind in my bodywork plan. This just means I need to
hit the ground running tomorrow, and get as much done as
possible. I might still be able to have the truck ready
to paint on Friday...but if not, then hopefully this
weekend. |
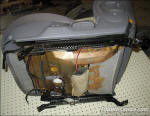
Fig. 07 - A shot of the bottom of the seats before
doing any modifications.

Fig. 08 - I bought these mounting brackets a
while back on E-bay and thought I'd give them a
try....but decided against modifying these to work.

Fig. 09 - Here's a view of the grille guard on my
4x4 that ended up supplying the steel for making the
seat brackets.

Fig. 10 - The headlight hoop on each side of the
grille guard was cut off and would become the major
mount section.

Fig. 11 - The mock-up

Fig. 12 - Here's the semi-finished mount in
place. I still need to drill the mounting holes, but
otherwise it's done.

Fig. 13 - A view of the mount with the seat's
plastic cover reinstalled. I'm not going to worry
about painting the bracket, since I'm going to be
mounting a louvered 1/8" steel panel over the mount as a
cover...that will be painted the carpet color (either
gray or black). |
Fig. 14 - A view of the back of the cab after
applying the POR-15 and Krylon Ultra-Flat black.
Fig. 15 - The interior roof panel was coated
with Eastwood Rust Encapsulator and looks good.

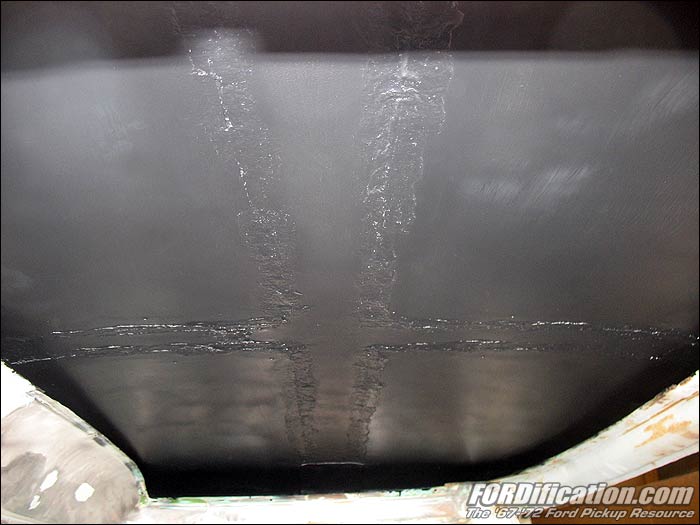
Fig. 16 - The rear cab wall painted
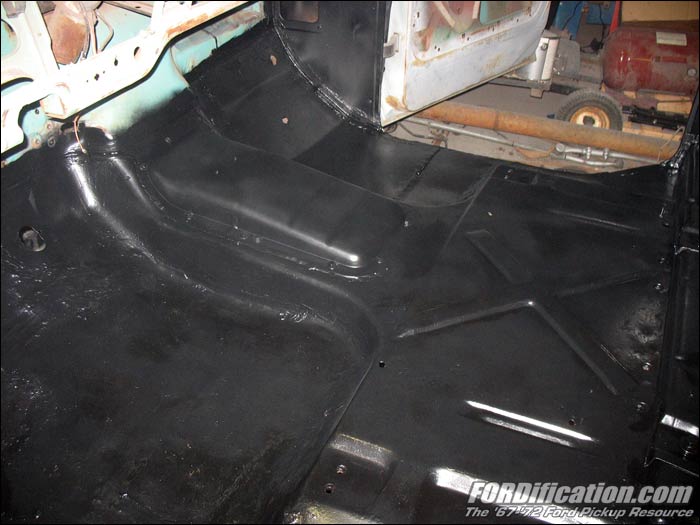
Fig. 17 - I got the tranny cover mounted and
sealed up.
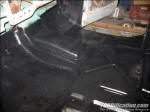
Fig. 18 - A final view of the freshly-painted
interior floorpans, after two coats of POR-15 and
several coats of Krylon paint. |
Thursday, May 10, 2007 -
Well, it's almost 11PM here...I just walked in the
door from a LONG day at the shop, most of it just
sanding. The good news is, I should finish with the
bodywork tomorrow (Friday), and depending on how
much time is left, I might get it painted. I have to
be home by 6PM to watch the kids, so whether or not
the truck gets painted tomorrow depends on how
quickly I can finish up the last-minute details on
the body.
However, the painting HAS begun! As most of you
know, the truck will be flat black, rattle-canned
over a coat of POR-15. Since I kinda wanted to test
out my painting process on a semi-hidden area of the
truck first, I decided to paint the outside rear of
the cab, since it will mostly hidden by the bed. I
used a small foam roller to apply the coat of
POR-15, then let it set up to where it was almost
dry (very tacky) and then rattle-canned on several
coats of Krylon Ultra-Flat. However, I was kinda
disappointed in the result. When painting everything
else this way (the engine bay, inner fenders, etc),
you couldn't see any streaks caused from using a
spray can. I always figured it was due to the POR-15
undercoat that helped absorb the Krylon. However,
this time you can definitely see streaks...it's very
obvious it's been rattle-canned on (Fig. 14).
I'm not sure if the streaks this time were caused by
the properties of the flat black paint or if maybe I
waited too long before applying it. I'm kinda
thinking it's the paint...however, when I go to
actually to the exterior body panels, I'm going to
try spraying the paint a little earlier and see if
that makes a difference. I'm not holding my breath
though. After giving it much thought today, I've
decided that I really don't want streaks in the
paint, so even though this IS supposed to be a
low-buck approach, if the exterior panels streak the
second time around, then I'm going to bite the
bullet and get a gallon of either Hot Rod Flatz or
John Deere Blitz Black and spray it on with a gun.
I'll make that decision for sure tomorrow
(hopefully) once I start doing the rest of the body
panels.
Anyway, I did get the cab ceiling painted...I had a
half-quart of Eastwood's Rust Encapsulator left
over, so I finished it off on the roof (Fig. 15). I
just used a brush to apply that, since I wasn't too
worried about brush strokes showing there...it'll
eventually get covered up. I also wanted to use a
regular bristle-type brush (as opposed to a foam
brush) in order to get the paint into the nooks and
crannies of the back side of the roof seams.
Then I got the inner rear cab wall and the front
kickpanel areas painted (Fig. 16), and I was finally
ready for the inner floorpans. However, I had to get
the tunnel cover mounted first (Fig. 17)...and then
I could finally get the floorpans painted (Fig. 18).
After two coats of POR-15 I gave them several coats
of Krylon Semi-Flat so that the glue for the floor
insulation I'm planning on installing under the
carpeting will have something besides the POR to
adhere to. |
|
|
Friday, May 11, 2007 - Well, THE
TRUCK IS PAINTED! (...more or less....if you
even want to call it that.) I finished up the
bodywork by early afternoon. Fig. 19-21 shows
the progression.
However, although it looks good in that last
pic...let me tell you that I cannot begin to
emphasize just how crappy it actually turned
out. It turned out so bad that I couldn't even
be upset, all I could do was laugh. Oh
well...live and learn, I guess. LOL
I kinda figured the flat black paint would leave
streaks, after testing it out yesterday. What I
didn't anticipate was the reaction it
would have with the POR-15 when applied before
it was almost dry. As stated last night, I'd
decided to try spraying the Krylon on a little
earlier in the drying process, to see if that
would eliminate (or at least reduce) the
streaking. However, by doing so, the solvents in
the POR-15 didn't have time to evaporate before
I tried to seal them up, so I ended up with all
kinds of paint popping. And not only that, but
it ended up wrinking the paint too...in fact,
almost giving it the texture of vinyl....or even
wrinkle paint. (Not quite that bad, but it's
getting close.) And on top of all that, it STILL
streaked! Fig. 22 shows a close-up shot of the
texture of the whole paint job now.
As you can see, the top roof panel actually
didn't texture quite that much or have much
paint popping, but that was because that's where
I started with the POR-15, so by the time I got
around to spraying the Krylon it was a bit drier
than the other panels. The doors and front
fenders didn't have as long to set up, so the
solvents in POR-15 were still evaporating when I
started spraying them. However, the roof does
have a slightly-worse case of the paint
streaking. Fig. 23 is a shot taken of the
driver's-side fender, which is indicative of the
rest of the body panels. You can see there's a
lot of paint popping. Man, when I saw that
starting to happen, all I could do was stare and
groan....and then laugh, since there was nothing
I could do about it. Don't get me wrong, I was
upset, especially because of all the time I'd
invested into the bodywork, but still...
Oh well...I guess it's not a total loss to make
the mistakes...as long as someone learns from
them!
I DID find that I was able to reduce the
streaking by spraying on VERY thick over-lapping
coats of Krylon, almost to the point of it
running. There must be 6-8 coats on the driver's
door and fender, but the streaking is still
there, just not as bad as the roof and passenger
side, but still too much, and simply not
acceptable.
I'm actually not too upset about the texture.
Given the theme of this project, it does kinda
add to the 'rough and ugly' part of it. I could
actually live with the texture and like it, but
the paint popping and the streaking just aren't
going to cut it. Therefore, I'm going to go
ahead and order a gallon of regular flat black
automotive paint. I'll give the truck a very
light sanding, just enough to smooth out the
dried pops and then spray it with a gun,
something I suppose in hindsight I should have
done in the first place....especially after the
failed test yesterday. |
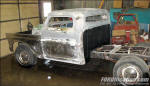
Fig. 19 - A shot taken just prior to
getting the truck painted, with all bodywork
completed.

Fig. 20 - Here's a view taken after
applying two coats of POR-15 to everything

Fig. 21 - ...and here's the finished
product. Well, at least for now anyway.
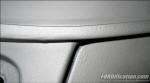
Fig. 22 - WHOA! Man, that's a funky-looking
finish! Whoops!

Fig. 23 - Most of the body panels, with
the exception of the roof, has some paint
popping. |
|
|
 |

Want to link to
this site? Please save this banner to your hard drive to place on your
webpage.
The correct link to use is
http://www.fordification.com
|